lEARNER'S HUB

Embark on a journey to master the art of shaving with Hype's X1 Razor. Our specially curated hub offers a comprehensive guide to ensuring a top-notch shaving experience. Have questions or need assistance? Connect with us at help@hyperazor.co - we're here to support you!


01 - Introduction to the X1 Razor

01

Unboxing Your X1 Razor

Unboxing Your X1 Razor

Welcome to the world of precision shaving with the Hype X1 Razor! We know you're eager to get started, so let's begin by carefully unboxing your new tool. Here's a step-by-step guide to help you safely unpack your X1 Razor:

01 Carefully Open the Packaging
  • Use a pair of scissors or a box cutter to gently cut any tape or seals.

  • Lift the top cover to reveal the inner packaging.

02 Remove the Contents
  • Inside, you'll find the X1 Razor, a pack of 20 non-proprietary blades, a Comfort Shave Setting, and the user guide.

  • Take your time removing these items to avoid any accidental damage or scratches.

03 Inspect the Razor
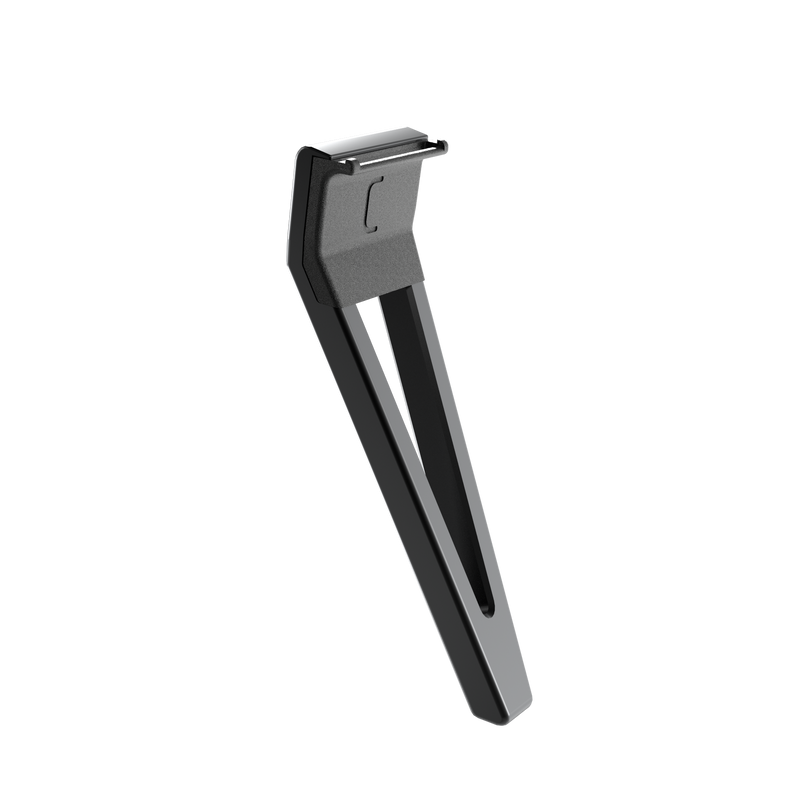
  • Hold the razor in your hand and feel its aerospace-grade aluminum construction.

  • Notice the ergonomic grip designed for equal pressure distribution across the razor head.

  • Check for any visual defects or damages.

04 Explore the Accessories
  • Locate the 20 blades that come with the razor. These should last you for six months of shaves.

  • Check the Comfort Shave Setting designed for everyday use.

05 Read the User Guide
  • Your X1 Razor comes with an intuitive user guide with step-by-step instructions on blade loading, shaving settings, and effortless cleaning.

  • Familiarize yourself with this guide as it contains essential information for optimal use.

06 Appreciate the Design
  • Your X1 Razor is not just functional but also aesthetically appealing. Enjoy its sleek and seamless design, available in various vibrant colors.

07 Store It Safely
  • If you're not ready to use the razor yet, store it in its original box or a safe place where it won't be accidentally damaged.

Congratulations! You're Now Ready to Explore Further

Your X1 Razor promises a premium shaving experience that reduces irritation and enhances comfort. In the next lesson, Understanding the Components (Razor, Blades, Settings), we'll guide you through the individual parts of your X1 Razor, helping you familiarize yourself with everything included in your package. Knowing the components well will pave the way for a smooth and enjoyable shaving experience. See you in the next lesson!

02

Understanding the Components (Razor, Blades, Settings)

Understanding the Components (Razor, Blades, Settings)

Welcome to the next step in your X1 Razor journey! In this lesson, we'll dive into the essential components of your X1 Razor, explaining the functionalities and intricacies of the razor itself, the blades, and the unique shave settings.

The Razor

  • Material & Design: Crafted from aerospace-grade aluminum, the razor's design ensures durability and resistance to corrosion. Its sleek and ergonomic grip ensures a comfortable and precise shave.

  • Size & Weight: Weighing only 58 grams and measuring 13 centimeters, it's perfectly balanced for an effortless shave.

The Blades

  • 20 Non-Proprietary Blades: Your X1 Razor comes with 20 blades, enough for approximately 6 months of shaves.

  • Injector Blade Magazine: Safe and easy-to-use, this allows you to quickly and effortlessly change blades.

  • Quality: Made in the USA, they ensure a smooth shave, with 7-11 shaves per blade.

The Shaving Settings

  • Sensitive, Comfort, and Ultra-Close: Three customizable settings that allow you to adjust the blade exposure, controlling the shave's aggressiveness.

  • Comfort Shave Setting (C): This pre-included setting is designed for everyday use and typical shavers.

  • How to Change Settings: Your user guide provides step-by-step instructions for adjusting the settings to suit your shaving preferences. For an in-depth guide, you can also refer to Lesson 1.5: Adjusting the Shaving Settings on this page.

Why It Matters?

Understanding the different components and their functionalities will allow you to tailor your shaving experience according to your skin and hair needs. The more you know about what's in your hands, the more control and enjoyment you'll get from your shaving experience.


Ready for the Next Lesson?

The Hype X1 Razor is not just about looks and components; it's about a complete shaving revolution. Next in: Why Choose the X1 Razor? (Benefits & Unique Features), we'll explore what truly sets the X1 Razor apart from the competition, diving into the benefits and unique features that make this razor a must-have in your grooming routine. See you there!"

03

Why Choose the X1 Razor? (Benefits & Unique Features)

Why Choose the X1 Razor? (Benefits & Unique Features)

As we conclude this introductory chapter, it's time to delve into what truly sets the X1 Razor apart from its competition. The Hype X1 Razor embodies more than a sleek design and quality build; it represents an entire philosophy towards shaving. Here's why the X1 Razor is more than a tool; it's an experience.

01 Exceptional Shaving Experience

  • Close, Comfortable Shave: Three customizable settings for a personalized shaving experience, whether you prefer a sensitive touch or an ultra-close finish.

  • Precision Engineered: Designed for maximum control and maneuverability, ensuring an irritation-free shave every time.

02 Affordable Luxury

  • Premium Materials: Aerospace-grade aluminum offers durability without sacrificing style.

  • Economical Blades: Non-proprietary blades that save you money without compromising quality.

03 Innovation at Your Fingertips

  • Sustainable Shaving: Designed with the environment in mind, promoting waste reduction through the use of non-proprietary blades.

  • Lifetime Warranty: We stand behind the quality of our products, offering a lifetime warranty for peace of mind.

04 Environmentally Conscious

  • Sustainable Shaving: Designed with the environment in mind, promoting waste reduction through the use of non-proprietary blades and razor design.

05 Community & Support

  • Dedicated Customer Service: Our team is here to support you on your shaving journey, with tutorials, guides, and responsive customer care.

  • Lifetime Warranty: We stand behind the quality of our products, offering a lifetime warranty for peace of mind.

Summing It Up

Choosing the X1 Razor is about embracing a new standard in shaving, where quality, customization, affordability, and environmental responsibility converge to redefine what shaving can be. It's not just a razor; it's a statement about who you are and what you value.

What's Next?

With this understanding of why the X1 Razor is the ultimate choice in modern shaving, it's time to dive into the practical aspects of making it part of your routine.

Chapter 2: Getting Started with the X1 Razor will guide you through the essential steps to a perfect shave:
  • Preparing for Your First Shave (Pre-shave routine)

  • Selecting the Right Shave Setting

  • Blade Loading

  • Tips for Safe Handling

Join us in the next chapter, where we'll turn the innovation and philosophy of the X1 Razor into a tangible, transformative experience. See you there!

02 - getting started with the 

x1 razor

01

Preparing for Your First Shave (Pre-Shave routine)

Preparing for Your First Shave (Pre-shave routine)

Welcome to the beginning of your journey with the X1 Razor. Proper preparation is key to achieving a perfect shave, and in this lesson, we'll guide you through the pre-shave routine that will set you up for success.

01 Cleanse Your Face
  • Why It Matters: A clean face clears away dirt and oil, paving the way for a smooth shave.

  • How to Do It: Use a gentle facial cleanser and warm water. Rinse thoroughly.

02 Exfoliate the Skin
  • Why It Matters: Exfoliation removes dead skin cells and can help prevent ingrown hairs.

  • How to Do It: Gently scrub your face with an exfoliating product or brush.

03 Apply a Pre-Shave Oil

  • Why It Matters: Pre-shave oils soften the beard and provide a protective layer, reducing friction.

  • How to Do It: Apply a small amount of pre-shave oil to the beard area and massage gently.

04 Prepare Your Shaving Cream or Gel
  • Why It Matters: A good lather ensures a comfortable shave, providing cushion and glide.

  • How to Do It: Use your Hype Shave Brush to whip your shaving cream or gel into a rich lather.

05 Warm the Blade
  • Why It Matters: A warm blade cuts more efficiently and offers a more comfortable shave.

  • How to Do It: Rinse the X1 Razor under hot water for a few seconds.

Taking the time to properly prepare your face is an essential part of achieving the best possible shave with the X1 Razor. By following these steps, you lay the foundation for a shaving experience that is not only efficient but enjoyable.

Ready to Continue?

The next step in your shaving journey is learning how to assemble your new X1 Razor. Join us in: Assembling the X1 Razor (Including Blade Loading), where we'll guide you through this simple yet important process.

02

Selecting the Right Shave Setting

Selecting the Right Shave Setting

The X1 Razor is designed to provide a shaving experience that's tailored to your personal preferences. With the revolutionary use of neodymium magnets, the strongest permanent magnets known, switching between shave settings becomes a seamless and elegant experience. Your X1 Razor comes pre-installed with the Comfort Shave Setting, ensuring a smooth and enjoyable shave for most users. But for those looking to further customize their shaving experience, we offer additional settings that can be effortlessly adjusted to suit your needs.

Understanding the Different Shave Settings

  • Comfort Shave Setting (Pre-installed): Ideal for everyday use, minimizing irritation and ensuring a smooth shave.

  • Sensitive Shave Setting: Designed for those with sensitive skin or prone to irritation. It offers a gentler shave. Shop for it here. Shop it here.

  • Ultra-Close Shave Setting:Perfect for those looking for a closer shave, suitable for those special occasions. Shop for it here. Shop it here.

How to Change Shave Settings

Switching between shave settings is quick and effortless with the innovative magnetic design:

  • Detach the Current Setting: Gently push the handle to detach the installed setting, leveraging the magnetic connection.

  • Select Your Desired Setting: Choose the setting that you want to use from the available options.

  • Attach the New Setting: Align the new setting with the handle, and the neodymium magnets will quickly connect the two parts securely.

Why Experiment with Different Settings?

Different shave settings allow you to control the aggressiveness of the shave. By experimenting with different settings, you can find the one that feels just right for you. The X1 Razor's intuitive magnetic design allows for hassle-free adjustments, so feel free to explore!

Learn in-depth about each setting or Shop additional shave settings.


Next: Blade Loading (Including Safe Handling)

With the shave setting selected and your X1 Razor assembled, you're ready to move on to the next step: blade loading. In the following lesson, you'll learn how to handle the blades safely and how to load them into your X1 Razor.

03

Blade Loading

Blade Loading

Loading a blade into the X1 Razor is a crucial step in ensuring a smooth and effective shave. An improperly installed blade can lead to uneven shaves or nicks. The X1 Razor offers two methods for blade loading: the Auto Way, which uses the injector blade magazine/dispenser, and the Manual Way, for those who prefer hands-on control. Both methods are designed for safety and convenience.

01

AUTO WAY

AUTO WAY

The Auto Way leverages the X1's design to function with most commercially available injector magazines. Follow these instructions to load a fresh blade without handling the blades with your bare hands:


  • STEP 01: Hold the razor in your left hand and the blade magazine in your right hand.

  • STEP 02: Insert the key of the blade magazine in the slot designed on the right side of the razor. (Image: Inserting blade magazine)

  • STEP 03: Pull the lever of the blade magazine to the extreme right, then push it to the left until the fresh blade is fully loaded into the razor.

  • STEP 04: If you are replacing an existing blade, the old blade will push out from the other end. You can safely dispose of it using the empty slot provided in the blade magazine. If you are loading an empty razor, your razor is ready to be used after step 3.

Note: Please ensure that the blade is fully inserted into the razor. If it's not positioned properly, you can manually push the blade all the way through to ensure the blade sits correctly.

02

MANUAL WAY

MANUAL WAY

While the X1 is designed to function flawlessly with an injector blade magazine, the design also allows for a simple and seamless manual process:


  • STEP 01: Push the bottom part of the shave setting with slight force and detach it from the razor body.

  • STEP 02: If the razor was without a blade to begin with, move on to step 3. If the razor contained an old blade, follow step 1 in a controlled manner to avoid accidental injury.

  • STEP 03: Take a fresh blade from the blade magazine by pulling and pushing the lever without inserting it into the razor.

  • STEP 04: Safely hold the new dispensed blade and place it on top of the shave setting. Make sure the cutting edge of the blade is facing the exposed side of the razor.

  • STEP 05: Align the shave setting with the razor body. The natural force of the magnets will immediately attach the razor body to the shave setting.

Note: The manual process is extremely safe as long as you do not rush and do it in a controlled manner.

PRO TIP: The manual process is most effective when you may want to quickly clean the insides of your razor during or after the shave. This process allows you to reuse the existing blade.

Conclusion

Loading the blade into your X1 Razor is a simple process whether you choose the Auto Way or the Manual Way. Both methods are designed with safety and convenience in mind, so you can focus on the perfect shave.

Next: Tips for Safe Handling

Get ready to explore further safety tips and best practices for handling your X1 Razor in the next lesson.

04

Tips for Safe Handling

Tips for Safe Handling

Ensuring safety during every phase of shaving is crucial, not only for an effective shave but also to prevent injuries. With the X1 Razor's advanced design and features, users are equipped with a reliable tool. Still, it's essential to be aware of some general safety guidelines for an optimal shaving experience.

01 Handle with Care
  • Always grasp the X1 Razor by its handle, not by the blade or blade-loading mechanism.

  • While the X1 Razor is designed with user safety in mind, careless handling can still lead to nicks or cuts.

02 Storing the Razor
  • Store your X1 Razor in a dry place when not in use. Avoid keeping it in damp environments like directly in the shower area.

  • Ensure the razor is out of reach of children and pets.

03 Changing the Blade
  • Always change the blade over a counter or sink to ensure you have a secure grip and to prevent dropping.

  • Use the Auto Way for blade loading to avoid direct contact with the blade.

  • If using the Manual Way, always handle blades from their sides, not the sharp edges.

04 Maintenance and Cleaning
  • Clean your razor after every use to remove hair, soap, and other residues.

  • Disassemble the razor periodically for a thorough cleaning, ensuring all components are completely dry before reassembly.

  • Inspect the blade for any signs of damage or rust. If in doubt, replace it with a new blade.

05 Mind the Shave Setting
  • Ensure the shave setting is correctly aligned with the razor body before shaving.

  • Adjust the shave setting according to your hair type and comfort, but always make adjustments when the razor is not in contact with the skin.

06 Stay Alert
  • Never use the X1 Razor while distracted. Focus on the task at hand to prevent accidental injuries.

  • If the razor feels different or seems to tug at the hair, inspect the blade and replace if necessary.

Safe handling of the X1 Razor is straightforward with the proper precautions. By adhering to these guidelines, users can ensure a smooth, comfortable shave every time.

Up Next: Now that you're equipped with the knowledge of the X1 Razor's features and safe handling techniques, it's time to delve deeper into the art of shaving. In the upcoming chapter, "Comprehensive Shaving Guide," we'll explore advanced shaving techniques tailored for different needs, learn about post-shave care, and address common concerns. Get ready to master the shave with our next lesson on specialized shaving techniques for varying skin types and preferences.

03 - Comprehensive Shaving Guide

01

Shaving Techniques for Different Needs

Shaving Techniques for Different Needs

Using the X1 Razor is a transformative experience due to its versatility. With three distinct shave settings, you have the flexibility to choose the technique that best suits your skin type and desired result. But before we delve into these techniques, let's discuss an essential aspect of shaving: the angle.


The Right Shaving Angle

  • Angle: Maintain an angle of about 30 degrees between the blade and your skin. This angle allows the blade to cut the hair efficiently without being too aggressive.

  • Guidance: Let the razor's head fully contact your skin. As you begin to shave, tilt the handle until you feel the blade engaging the hairs. This is your optimal angle.

01 Gentle Glide Technique
Recommended Shave Setting: Use the X1 Razor's "Sensitive" setting.
Ideal for: Those with delicate, easily irritated skin or for individuals prone to razor bumps.

Steps:
  • Prep Your Skin: Always start with freshly washed and hydrated skin. Use a mild cleanser and warm water.

  • Shave WTG (With The Grain): This reduces the chances of nicks, cuts, and ingrown hairs.

  • Gentle Strokes: Use light, short strokes without pressing too hard. Let the weight of the X1 Razor do the work.

02 Balanced Finish Technique

Recommended Shave Setting: Adjust your X1 Razor to the "Comfort" setting.

Ideal for: Daily shavers seeking a balance between closeness and comfort.


Steps:

  • Pre-Shave Routine: Apply a thick layer of quality shaving cream. Allow it to sit for a minute to soften the hair and lubricate the skin.

  • Mix the Directions: Start by shaving WTG. For a closer shave on the second pass, go XTG (Across The Grain).

  • Rinse Frequently: Regularly rinse the blade under running water to prevent clogging.

03 Precision Cut Technique
Recommended Shave Setting: Opt for the X1 Razor's "Ultra-Close" setting.
Ideal for: Achieving the smoothest possible finish for special occasions.

Steps:

  • Thorough Preparation: Hydrate the skin with warm water. Apply a pre-shave oil followed by a rich lather of shaving cream.

  • Three-Pass Shave: Start by shaving WTG. For the second pass, go XTG. Conclude with a careful pass ATG (Against The Grain).

  • Taut Skin: Gently stretch the skin with your free hand, providing a flat surface for the razor.

  • Re-lubricate: Before each pass, ensure the skin is adequately lubricated.

Whether you're seeking a gentle touch, a balanced finish, or a precision cut, the X1 Razor is your tool of choice. It's essential to remember that while we've suggested specific shave settings for each technique, these are mere recommendations. The X1 Razor is designed with your unique needs in mind. Listen to your skin, understand the desired outcome, and feel free to use any technique with the shave setting that suits you best. By combining the knowledge of these techniques with the versatile settings, you'll truly elevate your shaving experience.

Up Next: The journey doesn't end post-shave. Dive into the essential steps of after-shave care in our next lesson!

02

After-Shave Care and Maintenance

After-Shave Care and Maintenance

Once you've mastered the art of shaving, maintaining your skin and your razor becomes essential. Proper after-shave care not only ensures healthy skin but also extends the lifespan and efficiency of your X1 Razor. This lesson covers the steps you should take post-shave to maintain optimal skin health and razor performance.

01 After-Shave Skincare

  • Cool Down

    Start by rinsing your face with cold water. This helps to close pores and soothe the skin after the heat of a shave.

  • Apply an After-Shave Balm or Lotion

    It’s essential to moisturize post-shave to hydrate and soothe the skin. Opt for a product that's alcohol-free to prevent stinging and drying out your skin.

  • Avoid Irritants

    For the first few hours after shaving, avoid using products that contain alcohol or other skin irritants. This ensures that your freshly shaved skin remains free from redness or burning sensations.

02 Razor Maintenance

  • Rinse Thoroughly

    Post-shave, rinse your X1 Razor under warm water. This helps to clear out any hair, skin, or soap remnants that might be trapped between the blades or within the razor's body.

  • Drying

    Shake off any excess water and dry the razor gently with a soft cloth. Avoid using abrasive materials which could damage the finish of the razor.

  • Blade Replacement

    Even though the X1 Razor is built for durability, blades will eventually dull with time. Depending on your shaving frequency and hair type, consider changing your blade after every 7-11 shaves for the best performance.

  • Safe Storage

    Store your X1 Razor in a cool, dry place. Avoid leaving it in wet or humid environments like the shower, as this can expedite the dulling of the blade and promote bacterial growth.

03 Regular Razor Cleaning

While daily rinsing is essential, you should also periodically deep-clean your razor. Use warm water and a gentle soap or cleaning solution to clean every part. This ensures optimal performance and maximizes the lifespan of your razor.


Just as a painter cleans their brushes after each masterpiece, so should you tend to your skin and X1 Razor after every shave. Embracing proper after-shave care and maintenance rituals will ensure that every shave is as smooth as the first and will keep your skin in top condition.

Up Next: Every tool and technique has its quirks. Learn how to troubleshoot common issues in our next lesson!

03

Troubleshooting Common Issues

Troubleshooting Common Issues

Every tool can occasionally present challenges. The X1 Razor is a premium tool, but understanding potential issues ensures that every shave remains exceptional. Let's guide you through troubleshooting some of the most frequent challenges.


01

Uneven Shave or Tugging Sensation

Uneven Shave or Tugging Sensation

An uneven shave or the feeling that the razor is tugging at your skin can be both uncomfortable and unsatisfactory. This could be due to various reasons.

01 Damaged Blade

Blades can be damaged if not loaded correctly, especially if the blade drags along the blade stop during loading.

Solution: If you suspect a damaged blade, replace it. Ensure the blade edge doesn't drag along the blade stop during insertion. Using the Manual Way of blade loading can further prevent this issue.

02 Wrong Shaving Angle

An incorrect shaving angle can result in an uneven shave.

Solution: Ensure that the razor is at the right angle to your skin—typically around 30 degrees.

03 Dull or Clogged Blade:

A blade that's lost its sharpness or is obstructed can lead to tugging and uneven shaving.
Solution: Ensure your blade is sharp, clean, and free from obstructions. Rinse the razor more frequently during your shave.

02

Skin Irritation or Razor Burn

Skin Irritation or Razor Burn

Skin irritation after shaving is a common problem and can result from several factors, including skin type, shaving technique, or the condition of your blade.

Causes and Solutions:

01 Excessive Pressure

Applying too much pressure can irritate the skin.
Solution: Let the weight of the razor do the work. Avoid pressing too hard.

02 Using a Dull Blade

A dull blade requires more passes and pressure, leading to skin irritation.
Solution: Replace the blade regularly and ensure it's sharp and free from debris.

03

Nicks and Cuts

Nicks and Cuts

While small nicks and cuts can occasionally happen, frequent occurrences can be a sign that your shaving technique needs a bit of refining or your equipment needs a check.

Causes and Solutions:

01 Rushing the Shave

Shaving hastily can often lead to mistakes and accidents.
Solution: Take your time, especially around the tricky areas like the chin and upper lip.

02 Improper Skin Stretching

Not stretching the skin enough can cause the razor to catch.
Solution: Use your free hand to stretch the skin, ensuring a smooth surface for the razor to glide upon.

04

Razor Doesn't Glide Smoothly

Razor Doesn’t Glide Smoothly

A smooth glide is essential for a comfortable shave. If your razor is not moving smoothly across the skin, it can make for a challenging shave.

Causes and Solutions:

01 Inadequate Lubrication

Not using enough lubrication can cause the razor to skip or drag.
Solution: Always ensure that you use sufficient shaving cream or gel, and it’s well-lathered before application.

Your X1 Razor is crafted for performance. By recognizing and troubleshooting common issues, you ensure the longevity of your tool and the quality of your shave.

Up Next: Have more questions? Dive into our FAQ section in the next lesson for answers about the X1 Razor!

04

Frequently Asked Questions

Frequently Asked Questions

Embarking on the shaving journey with the X1 Razor can be an exhilarating experience. As with any new endeavor, it's natural to have questions. In this section, we'll address the most frequently asked questions to help you navigate the world of X1 Razor with ease.


01

How often should I change the blade on my X1 Razor?

How often should I change the blade on my X1 Razor?

It depends on the frequency of your shaves and the coarseness of your hair. However, a general guideline is to change the blade after every 7-11 shaves for optimal performance. If you notice tugging or discomfort, it might be time for a blade change.

02

Can I use any brand of blades with the X1 Razor?

Can I use any brand of blades with the X1 Razor?

The X1 Razor is compatible with any standard injector blades and injector blade magazines/dispensers. This flexibility allows you to choose between the blades we supply or any other brands available in the market, ensuring you always get the best shave.

03

What's the difference between the three shave settings?

What's the difference between the three shave settings?

The X1 Razor offers three settings: Sensitive, Comfort, and Ultra-Close. The Sensitive setting provides a gentle shave, ideal for those with sensitive skin. The Comfort setting offers a balanced shave suitable for daily use. Ultra-Close is designed for those seeking a close shave, removing even the shortest hairs.

04

How do I clean my X1 Razor?

How do I clean my X1 Razor?

Rinse the razor under warm water after every shave. For a more thorough cleaning, take advantage of the X1 Razor's unique magnetic connection. This feature lets you easily split the razor into its two-part design, enabling deep cleaning. After cleaning, the two parts can be effortlessly reconnected, prepping the razor for your next shave. Avoid using harsh chemicals; warm water and mild soap will suffice.

04

 Is there a specific angle I should hold the razor at when shaving?

 Is there a specific angle I should hold the razor at when shaving?

Yes, holding the razor at the right angle is crucial for an effective and safe shave. Typically, a 30-degree angle relative to your skin is ideal. This angle allows the blade to cut the hair efficiently without causing nicks or irritation.

04

I have sensitive skin. How can I avoid irritation?

I have sensitive skin. How can I avoid irritation?

If you have sensitive skin, always start with the Sensitive shave setting. Ensure you use a good quality shaving cream or gel, shave with the grain (WTG), and avoid multiple passes over the same area. Regularly change your blade and follow our after-shave care guidelines for best results.

04

Why is my razor dragging or skipping on my skin?

Why is my razor dragging or skipping on my skin?

Dragging or skipping can be due to multiple reasons such as a dull blade, inadequate lubrication, or applying too much pressure. Ensure you have a sharp blade, use ample shaving cream or gel, and allow the weight of the razor to guide you.
We hope this FAQ section has provided clarity on some of the common questions related to the X1 Razor. However, these questions only scratch the surface. If you're facing more specific or persistent issues, we strongly recommend you refer to Chapter 6: Troubleshooting and Common Issues. This chapter offers a comprehensive guide with in-depth solutions to address a variety of challenges, ensuring that you always have the assistance you need at every step of your shaving journey.

04 - Customizing your shave experience

01

Understanding Shave Settings in Detail

Understanding Shave Settings in Detail

Achieving the perfect shave is a balance between technique and technology. The X1 Razor incorporates advanced design elements that cater to your unique shaving needs. Among the standout features are the adjustable shave settings, which we’ll explore in detail, demystifying the science behind blade exposure and blade gap.


The Mechanics of Shave Settings

At the heart of the X1 Razor's versatility lies its ability to adjust both the blade exposure and the blade gap. To put it simply:

  • Blade Exposure

    Refers to the amount of the blade that's exposed beyond the razor's safety bar. Greater exposure generally leads to a more aggressive shave, while less exposure offers a gentler touch.

  • Blade Gap

    Refers to the space between the blade and the safety bar. A larger gap provides room for thicker facial hair to enter and be cut, while a smaller gap is more restrictive and provides a milder shave.

These adjustments are crucial in tailoring the shaving experience to your specific needs and preferences.

01 Sensitive Setting
Offers minimal blade exposure and a tight blade gap, ensuring a gentler contact with the skin.

Benefits:
  • Minimized risks of razor burns and irritations.

  • Light touch ensures a soothing experience.

Recommended for:
  • Those new to shaving.

  • Days when your skin feels particularly sensitive.

02 Comfort Setting
Strikes a balance with moderate blade exposure and gap, making it a go-to setting for regular shaving routines.

Benefits:
  • Ideal for daily shavers.

  • Achieves a close shave without feeling too aggressive.

Recommended for:
  • Those who shave daily or every other day.

  • People seeking consistent comfort.

03 Ultra-Close Setting
Maximizes blade exposure and features a more pronounced blade gap, targeting each hair with precision for a highly efficient shave.

Benefits:

  • Achieves a baby-smooth finish.

  • Best suited for thicker, coarser facial hair.

Recommended for:
  • Individuals with thicker beards.

  • When desiring the longest duration between shaves.

Understanding the delicate dance between blade exposure and blade gap is pivotal in making the most of your X1 Razor. These adjustable settings, deeply rooted in the mechanics of the razor, are more than just numbers; they're your key to a customized and unparalleled shaving experience.

Next Up: Embark on a journey to discover and establish your perfect shaving routine in Lesson 4.2!

02

Finding Your Perfect Shave Routine

Finding Your Perfect Shave Routine

A perfect shave is as much about the routine as it is about the razor. Each individual's skin type, facial hair density, and personal preferences play a role in defining that ideal regimen. This lesson offers guidance to help you determine your unique shaving routine using the X1 Razor.

Understanding Your Skin and Hair

Before setting up a shaving routine, it’s vital to understand your skin type and the nature of your facial hair.

  • Skin Type

    Dry, oily, sensitive, or combination. Knowing this will help you choose suitable pre-shave, shaving, and post-shave products.

  • Facial Hair

    Coarse or fine, dense or sparse, fast or slow-growing. This will determine the frequency of your shaves and the setting you might prefer.

Developing a Routine

  • Frequency

    • Daily Shavers

      If you have fast-growing or dense facial hair, or simply prefer the feel of a fresh shave each morning, consider the 'Comfort' setting for a daily routine.

    • Alternate-Day Shavers

      Those with moderately growing hair can opt for every other day, possibly using the 'Ultra-Close' setting for a prolonged smooth finish.

    • Weekly Shavers

      For those who enjoy sporting a stubble look occasionally or have slow-growing hair, the 'Ultra-Close' setting once a week should suffice.

  • Preparation

    Always start with clean and moist skin. A warm shower or a hot towel can soften the facial hair, making it easier to shave. Applying a quality pre-shave oil or lotion can further prep the skin.

  • Shaving Cream/Gel

    Invest in a good quality shaving cream or gel that suits your skin type. It should offer a thick lather to provide a protective cushion between the blade and your skin.

  • Technique

    As discussed in previous lessons, ensure you maintain the correct angle with the razor. Always start with the 'With The Grain' (WTG) technique, especially if you're new to shaving or using the X1 Razor.

  • Post-Shave

    Rinse your face with cold water to close the pores. Apply an alcohol-free, moisturizing after-shave to soothe and hydrate the skin.

Experiment and Evolve

No two faces are the same, and neither are their perfect shave routines. Start with the guidelines provided, but feel free to tweak and adjust as you understand your skin and facial hair better. Remember, the best routine is the one that feels right to you.


Finding your perfect shave routine is a journey of understanding your unique facial features and experimenting with various techniques and settings. Embrace the process and relish the results each time you look in the mirror, feeling confident and refreshed.

Next Up: Ready to level up? Dive into Lesson 4.3 for advanced tips and techniques with your X1 Razor.

03

Advanced Tips and Techniques

Advanced Tips and Techniques

Even seasoned shavers can benefit from learning a few advanced techniques, as there’s always room for improvement in the quest for the perfect shave. This lesson will arm you with expert tips and techniques, helping you make the most out of every shave with your X1 Razor.

Mastering The Three Passes

  • First Pass (WTG - With The Grain)

    Your first pass should always be with the grain of your beard growth. This takes off the bulk of the hair without causing much irritation.

  • Second Pass (XTG - Across The Grain)

    This pass is generally perpendicular to the direction of your beard growth. It offers a closer shave than the WTG pass without the potential irritation of an ATG pass.

  • Third Pass (ATG - Against The Grain)

    For those seeking an ultra-close shave, the third pass against the grain can deliver that baby-smooth finish. However, if you have sensitive skin or are prone to ingrown hairs, it's advisable to skip this pass.

Optimal Blade Angle

While we touched upon the importance of maintaining the right angle in previous lessons, mastering it can substantially enhance your shaving experience. The optimal angle is approximately 30°.

Tip: Start with the top of the razor head touching your skin and the handle pointing straight out. Slowly tilt the handle downward until the blade just contacts the skin. This will be close to the optimal angle.

Stretching The Skin

By pulling your skin taut, you can provide a smoother surface for the blade, making it easier to achieve a close shave without nicks or irritation. Use your free hand to gently stretch the skin in the opposite direction you're shaving.

Mapping Your Beard Growth

Understanding the direction of your beard growth can significantly improve your shaving technique. Spend some time feeling your stubble with your fingers to determine the growth pattern. Remember, not all areas of your face will have hair growing in the same direction.

Changing The Blade

An advanced user knows when it's time to change the blade. If you start to feel tugging or if the blade doesn't glide as effortlessly, it's likely time to swap it out for a fresh one. Keep in mind our earlier advice about getting 7-11 shaves per blade for optimal performance.

Post-Shave Cool Down

After your shave, consider using an alum block or witch hazel as an astringent. These can help soothe the skin, prevent razor burn, and provide immediate feedback on your technique. If it stings a lot, you may have used too much pressure or had the wrong angle during your shave.


Shaving is as much an art as it is a science. By mastering these advanced techniques and understanding your face better, you can elevate your shaving experience to new heights. It's a journey of continuous learning and refining, making each shave better than the last.

Next Chapter Preview: Explore the world of blades, materials, and the artistry behind the X1 Razor in our upcoming chapter, diving deeper into its craftsmanship and design nuances.

05 - Blade and Essential Accessories

01

The Heart of the Shave: Injector Blades

The Heart of the Shave: Injector Blades

Before diving into the intricacies of the X1 Injector Blades, it's essential to appreciate the rich history and evolution behind this game-changing design. Your daily shave isn't merely an act but an experience steeped in history and innovation.

A Glimpse into History: The Birth of Injector Blades

The tale of the injector blade is deeply rooted in the ingenuity of one man, Col. Jacob Schick. In the early 20th century, Schick, a passionate innovator in the world of shaving, identified the need for a safer, more efficient blade-changing system. In 1926, he patented the design for the injector blade, forever revolutionizing the shaving industry.


This wasn't just a new blade on the block, but a transformative approach to men's grooming. The design and mechanism, with its emphasis on safety and efficiency, quickly became a favorite. Over the decades, while many shaving technologies came and went, the injector blade's design and functionality have endured, bearing testament to Schick's vision and the blade's unmatched efficacy.

The Non-Proprietary Advantage and Cost Efficiency
When it comes to cost, the X1 Injector Blades stand head and shoulders above competitors, offering incredible value. Here's a simple breakdown:
  • Cost of one blade dispenser: $12

  • Number of blades per dispenser: 20

  • Cost per blade: $12/20 = $0.60

  • Assuming an average of 9 shaves per blade (taking the midpoint of 7-11 shaves), the cost per shave translates to: $0.60/9 = $0.067, or just under 7 cents per shave.

If you shave daily, annually, this amounts to a mere $24.55! Comparing this with the typical multi-blade cartridge refills, which can cost anywhere between $2 to $6 per cartridge (lasting about a week), you're looking at yearly costs ranging from $104 to $312. The savings with the X1 system are evident.

Why Opt for Injector Blades?

  • Ease of Loading

    The unique design of injector blades means you can eliminate the cumbersome and often unsafe task of manually handling and loading blades. The injector mechanism ensures a swift, safe, and precise loading process every time.

  • Consistency

    Forget about the surprises of uneven blade sharpness. Injector blades maintain a uniform sharpness across the blade, ensuring that each shave feels just as smooth and effective as the first.

  • Safety

    The injector system is designed with user safety at its core. By reducing direct contact with the blade, the chances of accidental nicks and cuts are significantly minimized.

  • Longevity and Smoothness

    One of the standout features of injector blades is their notable thickness. Being twice as thick as a standard double-edged (DE) blade, they offer double the shaves. This added thickness doesn’t just translate to longevity but also ensures each shave is smoother and more comfortable, resulting in a consistently close shave without irritations.

The X1 Injector Blades bring together a rich history, cutting-edge innovation, and unparalleled performance. Embracing the X1 system is not just choosing a shave but opting for a legacy of quality and the promise of an impeccable shaving experience every single time.

02

Blade Care, Storage, and Disposal

Blade Care, Storage, and Disposal

The Importance of Blade Care

A sharp and well-maintained blade is crucial not only for a close, smooth shave but also for ensuring your skin remains irritation-free. Proper blade care can extend the life of each blade, offering more consistent and comfortable shaves over time.

Storing Your Blade: Keep it Dry and Safe

  • Dry After Use

    Always pat your blade dry with a soft cloth or tissue after use. This prevents any water or moisture build-up which can lead to rust or dulling of the blade edge.

  • Safe Storage

    When not in use, store your razor in a dry place. An upright position, like in the Hype Razor Stand, allows the blade to air out and minimizes moisture retention.

  • Away from Humidity

    Avoid keeping your blade in damp places like directly in the shower. Humidity can decrease the longevity of the blade.

Disposal: Safety First

  • Using the Injector Blade Magazine

    Our provided injector blade magazine comes with a designated slot specifically designed for disposing of used blades safely. Always use this slot to ensure that no one accidentally gets cut, especially if you have kids or pets.

  • Recycle When Possible

    Check local recycling rules. Some municipalities allow for the recycling of used blades, but they must be safely stored in a hard container.

  • Avoid Loose Disposal

    Never throw away loose blades in the trash. This poses a risk to sanitation workers and others who might come in contact with your waste.


Blade care and proper disposal are not just about maintaining the quality of your shave but also about ensuring safety for yourself and others. With minimal effort, you can maximize the life of your blades and ensure that you're disposing of them responsibly.

03

Elevating Your Shave: The Stand and Its Benefits

Elevating Your Shave: The Stand and Its Benefits

Many overlook the importance of a razor stand, viewing it merely as a vanity accessory or luxury. However, the reality is that the razor stand is an integral part of ensuring a long-lasting, top-performing razor. This seemingly simple tool offers numerous benefits that will improve your shaving experience.

01 Aesthetically Pleasing

The first thing most people notice about a razor stand is how it elevates the look of their bathroom. An elegant stand not only showcases the beauty of the X1 Razor but also de-clutters your shaving area. It's a simple way to add a touch of class to your grooming routine.

02 Blade Longevity

A stand, especially one designed for the X1 Razor, ensures that your razor is stored upright. This position aids in drying the blade faster, reducing the risk of moisture-induced damage or rusting.

03 Safety

With the razor securely placed on a stand, there's a decreased risk of accidental cuts or nicks when reaching for other items on your counter. The stand ensures the blade isn't in direct contact with surfaces, reducing the potential for contamination.

04 Optimal Storage

Storing your razor upright on a stand protects the blade's edge from unnecessary wear and damage. This ensures that the blade remains sharp and ready for your next shave, prolonging the intervals between blade replacements.

05 Hygiene and Cleanliness

The stand's design allows for adequate airflow around the razor, preventing the build-up of moisture and bacteria. This contributes to a more hygienic shaving experience and ensures that your blade remains in optimal condition for longer.

06 Easily Accessible

With the razor in a stand, you can easily pick it up and place it back after every use, streamlining your shaving routine and making it hassle-free.


The razor stand is not just a piece of decor – it's a functional accessory that protects, showcases, and enhances the longevity of your X1 Razor. Investing in one is a step towards a more refined and efficient shaving experience.

04

Maximizing Your Shave: The Role of the Shave Brush

Maximizing Your Shave: The Role of the Shave Brush

More Than Just a Brush

To the uninitiated, a shave brush might seem like an unnecessary accessory. After all, can't you just apply the shaving cream or soap with your hands? The truth is, a shave brush does so much more than just help apply lather. It plays a pivotal role in elevating the entire shaving process.

Benefits of Using a Shave Brush

  • Exfoliation

    Using a shave brush helps in exfoliating the skin, removing dead skin cells, and ensuring a smoother shave. This also reduces the chances of ingrown hairs.

  • Richer Lather

    A shave brush helps in producing a thick and rich lather, ensuring better protection and lubrication during the shave. This leads to fewer nicks and cuts.

  • Even Application

    With a shave brush, you can ensure an even application of the shaving cream or soap, leading to a consistent shave.

  • Lifting Hair
    A brush helps lift the facial hair, making it easier for the razor to cut and leading to a closer shave.
  • Heat Retention

    A warm lather helps in opening up the pores and softening the hair. A shaving brush retains the heat from the hot water, ensuring a warm lather throughout the shave.

  • Economic

    Using a shave brush ensures you use just the right amount of shaving cream or soap, leading to savings in the long run.

Using a shave brush helps in exfoliating the skin, removing dead skin cells, and ensuring a smoother shave. This also reduces the chances of ingrown hairs.

Why Hype's Shave Brush?

While all brushes serve the primary function, not all are made equal. Hype's Shave Brush, crafted with precision and using only the highest quality materials, offers a superior shaving experience.

  • Bristle Quality

    Our brush uses synthetic fibers designed to mimic the best characteristics of badger hair without harming any animals. It's soft on the skin but robust enough to whip up a dense lather.

  • Ergonomic Design
    The handle of Hype's Shave Brush is ergonomically designed to offer a comfortable grip, ensuring maximum control during the lathering process.
  • Aesthetic Appeal
    Our brush isn't just functional; it's a piece of art. It beautifully complements the X1 Razor and is sure to enhance the aesthetics of your bathroom.

The right shave brush, especially one as meticulously crafted as Hype's Shave Brush, can drastically elevate the quality of your shave. It's not just an accessory; it's an investment into a better shaving experience.

Shop Hype's Shave Brush here.

05

Getting the Most Out of Your X1 Razor

Getting the Most Out of Your X1 Razor

The Holistic Approach to Shaving

When you possess an exquisite instrument like the X1 Razor, you owe it to yourself to maximize its potential. It's not just a razor, but the cornerstone of a holistic shaving experience. Every accessory, from the injector blades to the shave brush, plays a pivotal role in transforming an everyday task into a luxurious ritual.

Understanding the Harmony

  • X1 Razor with Injector Blades
    At the heart of your shaving journey lies the X1 Razor. With its customizable settings, magnetic connection, and ergonomic design, it promises precision and comfort. Complementing it with the right injector blades ensures a smooth, close, and comfortable shave every time.
  • The Stand

    More than just a resting place, the Stand ensures your razor dries properly, prolonging its life and maintaining its pristine condition. Moreover, it's a symbol of elegance on your bathroom counter.

  • Shave Brush
    This isn't merely a tool; it's an enhancer. The Hype Shave Brush promises a luscious lather, even application, and a gentle exfoliation, setting the stage for the X1 Razor to work its magic.
  • Blade Care
    The longevity of your blades is paramount. Proper storage, care, and disposal not only ensure safety but also maximize the efficiency of each blade.

The Cumulative Effect

Using all the accessories in harmony doesn't just ensure a great shave, but a consistently great shave. It means lesser skin irritation, longer-lasting blades, and an all-round luxurious experience every single time.

Elevate the Experience: Considering a Bundle

For those who seek the utmost excellence, consider our Full Set which brings everything together: the X1 Razor, the Injector Blades, the Stand, and the Hype Shave Brush. Furthermore, we've curated various bundles tailored to individual needs, ensuring you find the perfect fit for your shaving regimen. Explore our Shop Page to delve into the options available.


The X1 Razor, with its blend of tradition and innovation, promises excellence. But, when paired with its dedicated accessories, it goes beyond that. It's not just about removing hair; it's about celebrating the ritual, embracing the process, and relishing the results.

In the grand orchestra that is the shaving experience, let the X1 Razor be your maestro, guiding every accessory to play its part to perfection.

06 - Troubleshooting the x1

!

My razor isn't cutting. What should I do?

! - My razor isn't cutting. What should I do?

If you find your X1 razor not cutting as it should, a variety of reasons could be behind this. We've put together a guide to help you identify and rectify the issue, ensuring a seamless shaving experience.


01 Blade Dullness

  • Cause

    Extended use of the same blade might cause it to lose its sharpness.

  • Solution

    Replace your blade after every 7-11 shaves or sooner if it doesn't feel sharp. Keep spare blades at the ready for such moments.

02 Blade Loading Concerns
  • Cause

    Blades can sometimes be compromised during the loading process, especially if the blade edge drags along the blade stop. If your shave feels patchy or the blade tugs at your skin, this might be the underlying cause.

  • Solution

    Consider inserting a fresh blade. While loading the new blade, ensure the blade edge doesn't drag along the blade stop. If you face challenges with the blade loading mechanism, we recommend trying the manual blade loading technique for a more controlled insertion. For detailed guidance on manual blade loading, please refer to Chapter 2, Lesson 2.3: Blade Loading.

03 Improper Shaving Technique

  • Cause

    The razor's angle can impact the shave quality.

  • Solution

    Try holding the razor at a 30-degree angle to your skin. With practice, you'll determine the best angle. Let the razor's weight guide the shave, avoiding unnecessary pressure.

04 Preparation of Skin

  • Cause

    Dry skin or facial hair can hinder a smooth shave.

  • Solution

    Ensure your skin is well moisturized. A shaving brush, used to apply shaving cream or soap, can elevate the hairs for an effective cut. Consider shaving post a hot shower or after using a warm towel on your face. Consider buying Hype's Shave Brush.

05 Regular Razor Maintenance

  • Cause

    Over time and with regular use, any razor might have a build-up of product residue or dead skin, although the X1 razor's design minimizes this risk.

  • Solution

    Make it a habit to rinse your razor during the shave. For optimal performance, disassemble and clean your razor periodically to keep it in pristine condition.

Different factors can influence the efficiency of your shave. If, after trying these solutions, you still face challenges, consider reaching out for more tailored assistance. Proper razor care is pivotal for a top-notch shave every time.

!

I'm having difficulty loading the blades.

! - I'm having difficulty loading the blades.

Blade loading, while designed to be seamless with the X1 Razor, may occasionally pose challenges for some users. We acknowledge that there can be a slight learning curve, but with a bit of guidance and practice, you’ll be changing blades with ease.


01 Misalignment of Blade and Mechanism

  • Cause

    Not aligning the injector key and the razor’s slot properly.

  • Solution

    Ensure that the key end of the injector is correctly fitted into the slot on the razor. Hold both the razor and the injector blade firmly while loading.

02 Compromised Blade During Loading
  • Cause

    Sometimes, the blade edge can drag along the blade stop while loading, affecting its cutting quality.

  • Solution

    While inserting the blade, ensure that its edge doesn't drag along the blade stop. If necessary, try the manual loading method, which offers more control. For detailed guidance, please refer to Chapter 2, Lesson 2.3: Blade Loading.

03 Forceful Loading

  • Cause

    Pushing too hard can sometimes misalign the mechanism.

  • Solution

    Gentle but firm pressure is the key. Allow the mechanism to smoothly slide in the blade without forcing it.

04 Presence of Debris or Residue

  • Cause

    Build-up in the blade slot might cause obstructions.

  • Solution

    Ensure the loading area of your razor is clean from any debris or old blade fragments. Consider rinsing and cleaning your razor periodically, especially the loading mechanism.

Loading a blade should become second nature with a bit of practice. If you consistently face challenges, revisit Chapter 2, Lesson 2.3 where we provide a detailed guide on blade loading. If you still encounter difficulties, don't hesitate to seek further guidance or watch our blade-loading tutorial for a visual guide.

!

Why isn't my razor providing a close shave?

! - Why isn't my razor providing a close shave?

A close, comfortable shave is the very reason many users switch to the X1 Razor. If you’re not achieving the smooth results you desire, various factors could be contributing. Let’s diagnose the potential issues.


01 Blade Sharpness

  • Cause

    A dull blade is the most common culprit behind a shave that isn't close enough.

  • Solution

    Make sure you replace blades regularly. Although the X1 Injector Blades are designed for longevity, they do wear out eventually. If your blade isn't sharp enough, it's time for a replacement. Typically, 7-11 shaves per blade is a good benchmark, though individual experiences might vary.

02 Incorrect Angle
  • Cause

    Not holding the razor at the optimal angle to the skin.

  • Solution

    Ensure that the razor’s head is flush against your skin and that you’re maintaining an angle of about 30 degrees. It might take some practice, but once you get the hang of it, this angle provides the closest shave.

03 Inadequate Prep

  • Cause

    The skin and hair haven't been sufficiently softened and prepared for shaving.

  • Solution

    Pre-shave preparation is crucial. Make sure to use warm water and a quality shaving cream or gel to soften the hair and hydrate the skin. Remember, softer hair cuts more easily.

04 Applying Too Much or Too Little Pressure

  • Cause

    Exerting the wrong amount of pressure affects the closeness of the shave.

  • Solution

    The X1 Razor, designed with a similar weight to multi-blade razors, is made of light aluminum. Thus, you should apply only slight pressure, akin to how you would with a multi-blade razor. Too much force can result in nicks and cuts, while too little might leave you with uneven shaves. Aim for a gentle, steady hand to get the most out of your shaving experience.

05 Multi-pass Shaving Technique

  • Cause

    Trying to achieve a close shave in a single pass.

  • Solution

    It's recommended to use multiple passes for an ultra-close shave. Start with a with-the-grain pass, followed by an across-the-grain, and finally an against-the-grain pass. Remember to reapply shaving cream or gel between passes.

Attaining that perfect, close shave might require a bit of patience and practice. Be mindful of your technique, and over time, you'll master the art of shaving with the X1 Razor. Should you need further guidance, don't hesitate to refer to our comprehensive shaving guide or reach out for assistance.

!

My razor feels too aggressive or too mild.

! - My razor feels too aggressive or too mild.

A comfortable shave is influenced by the aggressiveness of your razor setting. If your X1 Razor feels either too harsh or too gentle, there are ways to adjust and optimize your shaving experience.


01 Unfamiliarity with the Settings

  • Cause

    The X1 Razor is designed with three customizable settings (Sensitive, Comfort, and Ultra-Close) to cater to every individual's shaving preference. If you're new to the razor or haven't changed settings in a while, it might not align with your current needs.

  • Solution

    Familiarize yourself with the three settings. Start with the Comfort Shave Setting (C) as it's meant for everyday use. Depending on your preference, you can then switch between the other two for a more customized experience.

02 Improper Setting Selection
  • Cause

    You might have chosen a setting that doesn't align with your skin type or facial hair density.

  • Solution

    If your skin feels irritated or the shave too close, consider switching to the Sensitive setting. Conversely, if the shave feels too mild, try the Ultra-Close setting. Remember, it's about finding the sweet spot for your skin.

03 Incorrect Shaving Technique

  • Cause

    The pressure and angle you use when shaving can influence the perceived aggressiveness of the razor.

  • Solution

    Make sure you're not pressing too hard and let the razor's weight do the work. Hold the razor at a 30-degree angle to your skin for optimal results. Adjusting your technique can often make a significant difference.

04 Blade Quality

  • Cause

    A dull or compromised blade might force you to apply extra pressure, making the shave feel more aggressive.

  • Solution

    Ensure your blade is sharp and in good condition. A dull blade will not only provide an inferior shave but can also increase the risk of nicks and cuts. If you suspect blade dullness, consider replacing it. Our blades ensure 7-11 quality shaves per blade.

05 Skin Preparation

  • Cause

    Dry skin or inadequately prepped facial hair can amplify the perceived aggressiveness of the razor.

  • Solution

    Always moisturize your skin before a shave. Using a shaving brush can also help in prepping your hair, making it easier for the blade to cut through and providing a smoother experience.

How to Change Shaving Settings

Your X1 Razor's unique design allows easy adjustment of the blade exposure. For step-by-step instructions on changing the shaving settings, refer to the user guide provided. For a more detailed guide, please see Chapter 2,  Lesson 02: Selecting The Right Shave Setting.
Personalizing your shave is pivotal. It might take a few tries to determine the right setting and technique, but once you do, you'll experience a comfortable and close shave tailored to you.

!

I'm experiencing irritation or razor burn.

! - I'm experiencing irritation or razor burn.

Razor burn or irritation after a shave can be discomforting. It's often characterized by redness, small red bumps, itchiness, or a burning sensation post-shave. Understanding the cause can help you mitigate the problem.


01 Blade Quality

  • Cause

    Using a dull or damaged blade can lead to tugging and pulling, causing discomfort.

  • Solution

    Make sure you're changing your blade regularly. Our blades offer 7-11 quality shaves per blade. If you feel any tugging or dragging, it's time to replace the blade.

02 Blade Loading Concerns
  • Cause

    Blades can sometimes be compromised during the loading process, especially if the blade edge drags along the blade stop. If your shave feels patchy or the blade tugs at your skin, this might be the underlying cause.

  • Solution

    Consider inserting a fresh blade. While loading the new blade, ensure the blade edge doesn't drag along the blade stop. If you face challenges with the blade loading mechanism, we recommend trying the manual blade loading technique for a more controlled insertion. For detailed guidance on manual blade loading, please refer to Chapter 2, Lesson 2.3: Blade Loading.

03 Improper Shaving Technique

  • Cause

    Applying excessive pressure, shaving against the grain, or using incorrect angles can cause irritation.

  • Solution

    Use gentle strokes and apply only minimal pressure. Start by shaving with the grain, especially in sensitive areas. Adjust the angle of the razor to about 30 degrees for optimal results.

04 Inadequate Skin Preparation

  • Cause

    Dry shaving or using subpar shaving creams/gels can result in razor burn.

  • Solution

    Ensure your skin is well-hydrated before shaving. Use warm water and a quality shaving cream or gel. Using a shaving brush can also help in adequately preparing your skin by lifting facial hair and exfoliating dead skin cells.Consider buying Hype's Shave Brush.

05 After-Shave Care

  • Cause

    Neglecting post-shave care can lead to skin irritation.

  • Solution

    Always rinse your face with cool water post-shave and apply a moisturizing after-shave balm or lotion. This will soothe your skin and reduce any inflammation.

06 Allergic Reaction

  • Cause

    Sometimes, irritation can be due to an allergic reaction to products used during the shaving process.

  • Solution

    If you've recently switched to a new shaving cream, gel, or after-shave, consider going back to a product you've used before without issues. If irritation persists, consult a dermatologist.

Tips for a Comfortable Shave

  • Always shave after a shower or rinse your face with warm water to soften facial hair.

  • Invest in a good quality shaving brush to exfoliate and prepare the skin.

  • Consider using pre-shave oils or creams for an added layer of protection.

  • Always finish with a soothing post-shave product.

Razor burn or irritation can be a thing of the past by adjusting your technique, ensuring proper skin preparation, and using quality products. Always listen to your skin's needs and make adjustments accordingly.


!

My blade seems dull or isn't performing well.

! - My blade seems dull or isn't performing well.

For an optimal shaving experience, the sharpness and performance of your blade are paramount. A blade that is not up to the mark can result in an unsatisfactory shave and potential skin issues.


01 Exceeded Usage Life

  • Cause

    Each blade is designed for a certain number of shaves. Over time, with repeated use, its performance might diminish.

  • Solution

    Our blades are crafted to deliver 7-11 quality shaves. If you've been using the blade beyond this range, it might be time for a replacement.

02 Improper Storage
  • Cause

    Storing blades in damp or humid environments can cause them to lose their sharpness quicker or even rust.

  • Solution

    Always store your blades in a dry place. If your bathroom tends to get steamy, consider storing them outside of the bathroom or ensuring proper ventilation.

03 Blade Damage during Loading

  • Cause

    If the blade edge gets damaged or nicked during the loading process, its performance will be compromised.

  • Solution

    Carefully load a new blade, ensuring the edge does not scrape against any parts of the razor. For a refresher on the correct technique, you can refer to the above troubleshooting question: I'm having difficulty loading the blades.

04 External Contaminants

  • Cause

    Accidental contamination, like dropping the blade or exposing it to harsh chemicals, can affect its sharpness.

  • Solution

    If you suspect your blade might've been contaminated, it's safer to dispose of it and insert a new blade.

05 Too Frequent Usage

  • Cause

    If you're shaving multiple times a day, the blade can wear out faster.

  • Solution

    Depending on your shaving frequency, adjust how often you change your blade to maintain a consistently sharp edge.

Tips to Prolong Blade Life

  • Dry the blade gently after each use to prevent moisture-related issues.

  • Store the blades in their protective casing when not in use.

  • Avoid touching the sharp edges of the blade directly to minimize potential damage.

A well-maintained blade ensures a smooth and comfortable shave every time. It's essential to monitor your blade's performance, store it correctly, and replace it timely for the best shaving experience.


!

My handle or other parts feel loose or damaged.

! - My handle or other parts feel loose or damaged.

Your X1 Razor is designed with precision and care to provide a smooth and comfortable shave each time. However, if you ever feel that the handle or the shave setting plate seems loose or damaged, it's essential to address the issue promptly to ensure safety and effectiveness.


01 Loose Shave Setting Plate

  • Cause

    The X1 Razor's shave setting plate and handle are magnetically connected. If the plate feels wobbly or loose, it could be due to a tolerance issue which might have arisen from production variances or after dropping the razor.

  • Solution

    While a minor misalignment can be corrected by carefully reattaching the plate to the handle, any persisting issue necessitates reaching out to our customer care team. They are trained to provide guidance on potential solutions or replacement if necessary.

02 Visible Damage or Deformation
  • Cause

    Accidental drops or extreme force applied to the razor can cause deformations or visible damages.

  • Solution

    It's essential to handle the razor with care. If any part of your X1 Razor appears visibly damaged, refrain from using it to avoid potential injuries. Contact our customer care team for further assistance.

03 Magnetic Connection Issues

  • Cause

    The magnet, being an integral part of the X1 Razor's design, ensures the attachment between the handle and the shave setting plate. Over time or due to external factors, its effectiveness might get compromised.

  • Solution

    The X1 Razor, with its unique design, ensures a premium shaving experience. If any part feels out of place or compromised, it's best to consult with our dedicated customer care team to restore the razor to its optimal function. Your safety and satisfaction are our topmost priorities.

The X1 Razor, with its unique design, ensures a premium shaving experience. If any part feels out of place or compromised, it's best to consult with our dedicated customer care team to restore the razor to its optimal function. Your safety and satisfaction are our topmost priorities.


07 - Maintenance and Sustainability

01

Cleaning and Storing Your X1 Razor

Cleaning and Storing Your X1 Razor

For any precision instrument, regular cleaning and proper storage are vital. This ensures the device functions at its best and lasts longer. Your X1 Razor is no different.

01 Cleaning Your Razor

  • After Each Use

    Rinse the razor under warm running water to remove hair, foam, and any residue. This prevents build-up and keeps the blade sharp.

  • Deep Cleaning

    Once a week, or whenever you change blades, it's advisable to give your razor a deeper clean. Disassemble the razor and wash each part with warm soapy water, using a soft brush to remove any stubborn residue. Rinse and let air dry.

02 Storing Your Razor

  • Dry First

    Always ensure your razor is completely dry before storing it. This helps in preventing corrosion or any potential damage.

  • Storage Location

    Store your X1 Razor in a cool, dry place. If your bathroom gets steamy or humid, consider storing your razor outside the bathroom to protect it from moisture.

  • Razor Stand

    Using the razor stand not only showcases the beauty of the X1 Razor but also keeps it in an optimal position, ensuring it remains dry and maintains its edge.Consider buyingHype's Razor Stand.


Regular cleaning and appropriate storage are straightforward but crucial steps to prolong the life of your X1 Razor and ensure every shave is as good as the first.

02

Blade Replacement and Disposal

Blade Replacement and Disposal

The secret to a smooth and effective shave often lies in the sharpness of the blade. Over time, blades tend to wear out, necessitating their replacement for optimal shaving performance. However, the disposal of used blades is equally significant, primarily due to environmental concerns.

01 When to Replace Your Blade

  • Frequency

    On average, each blade provides 7-11 shaves. However, the exact number may vary based on the coarseness of the hair, the shaving technique, and the frequency of shaves.

  • Signs of Wear

    If you notice any tugging, discomfort, or unevenness during your shave, it's a clear sign that the blade needs replacement.

02 Replacing the Blade

  • Safety First

    Always handle the blade by its ends. Avoid touching the sharp edges to prevent any accidental cuts.

  • Using the Injector Blade Magazine

    This tool makes blade replacement a breeze. Position the new blade over the razor head and slide it into place. Once done, you can safely eject the old blade.

03 Disposal of Used Blades

  • Injector Blade Dispenser

    Your X1 Razor's Injector Blade Magazine is designed with sustainability in mind. Apart from dispensing fresh blades, it features a slot for used blades, allowing for easy and safe storage until they're ready to be disposed of.

  • Environmentally Responsible
    Injector blades are typically made of stainless steel, which is recyclable. Check with your local recycling guidelines to ensure proper disposal.
  • Safety
    Using the designated slot in the injector blade dispenser ensures safety, preventing accidental cuts or injuries when handling used blades.

Replacing and disposing of your blades responsibly ensures not only an excellent shaving experience but also reduces environmental impact. Being mindful of the lifecycle of your blade ensures safety, efficiency, and sustainability.

03

Environmental Benefits of the X1 Razor

Blade Replacement and Disposal

In the modern world, where sustainability and eco-friendliness are increasingly essential, the X1 Razor stands out as a beacon of environmentally-conscious design. Let’s delve into how your choice to use the X1 Razor positively impacts our planet.

01 Durable Design Reduces Waste

  • Built to Last
    Crafted from aerospace-grade aluminum, the X1 Razor's durable design ensures a long-lasting shaving tool. This translates to fewer razors ending up in landfills.
  • Economic Savings
    Apart from the environmental benefits, a durable product also means reduced expenses in the long run as you won't need to buy replacements frequently.

02 Reduced Plastic Consumption

  • Less Plastic Waste

    Unlike disposable razors, which largely consist of non-recyclable plastics, the X1 Razor uses no plastic, reducing the environmental footprint.

  • Eco-friendly Packaging

    Our packaging materials are consciously chosen to minimize waste and are recyclable, further diminishing plastic pollution.

03 Sustainable Blade Disposal

  • Recyclable Blades

    The stainless steel used in our blades is recyclable. By ensuring proper disposal, especially with our specially designed injector blade dispenser with a used blade slot, you’re helping to reduce unnecessary waste.

  • Longer Lifespan
    Our blades are designed to provide 7-11 shaves per blade, which reduces the frequency of replacements and, in turn, waste generation.

04 Minimalistic Design for Reduced Resource Use

  • Resource Efficiency

    The minimalistic design of the X1 Razor ensures that no excess materials are used in its production. This efficient use of resources means a smaller environmental footprint in its manufacturing.

  • Energy Efficiency
    A streamlined production process also translates to less energy consumption during manufacturing, thereby reducing carbon emissions.

05 Promotion of Conscious Consumerism

  • Informed Choices

    By choosing the X1 Razor, you're not just selecting a superior shaving tool; you're making an environmentally conscious decision that promotes sustainable living.

  • Educating Consumers
    We're dedicated to spreading the word about sustainable practices and the benefits of eco-friendly products. By supporting us, you're also championing a more sustainable and informed world.

Embracing the X1 Razor is more than just a choice for a premium shaving experience. It's a decision that aligns with a sustainable future and contributes to a healthier planet for generations to come.

08 - Support and Warranty

01

Accessing Customer Support

Accessing Customer Support

Ensuring a seamless experience with the X1 Razor is our top priority. While our product is crafted with precision and care, we understand that questions may still arise. To assist you, we offer:

Email Support

  • You can reach out to us at hey@hyperazor.co
  • We aim to respond to all emails within 24 hours. During peak times, please allow up to 48 hours for a reply.

FAQ Section

For instant solutions to common queries, our FAQ section is your go-to resource. It covers a broad range of topics that address most concerns and queries related to the X1 Razor. Simply visit our website and click on the FAQ link located in the footer.

Learner’s Hub

This hub – the very page you're on – offers in-depth information, tips, techniques, and troubleshooting solutions for the X1 Razor. We've curated this content meticulously to ensure it caters to all your needs. Scroll through the topics to find comprehensive guides on various aspects of the X1 Razor, from basic handling to advanced maintenance.


Your satisfaction is our utmost concern. If you encounter any challenges or have queries, don't hesitate to contact us through email. We're always eager to hear from our users, be it for guidance, troubleshooting, or feedback.

02

Understanding the Lifetime Warranty

Understanding the Lifetime Warranty

The X1 Razor Lifetime Warranty: What You Need to Know

01 Commitment to Excellence

At X1 Razor, we pride ourselves on the quality and craftsmanship of our products. That's why we're confident enough to offer a lifetime warranty on our razor. It’s a testament to our belief in the durability and performance of the X1 Razor.

02 Coverage

The lifetime warranty covers any manufacturing defects in materials and workmanship. This includes issues like faulty parts or any other production-related problems that can affect the usability of the razor.

03 What It Doesn't Cover

Wear and tear from regular use, accidental damage, misuse, or modifications to the razor are not covered. It's also crucial to note that blades, due to their consumable nature, are not part of this warranty.

04 Claiming the Warranty

If you believe your razor has a defect covered by our lifetime warranty:

  • Document the issue with clear photographs.
  • Send these photos, along with a detailed description of the problem, to our customer support team at hey@hyperazor.co.
  • Our team will evaluate the issue and guide you through the next steps.

05 Replacement & Repairs

Should your claim be approved, we'll offer a repair or replacement, at our discretion. We aim to ensure you have a functioning X1 Razor, living up to our promised standards.

06 Proof of Purchase

It's important to keep your original purchase receipt or order confirmation. We may ask for it to verify the authenticity of your product and validate the warranty claim.


Remember, our lifetime warranty is our pledge to you, reflecting our commitment to excellence. While we stand by the quality of the X1 Razor, should any unexpected issues arise, know that we're here to make things right.

03

Shipping Policy

Shipping Policy

Shipping From Our Warehouse

All of our products are shipped from our warehouse in Wisconsin, US. We strive to send your orders to most countries, with a few exceptions due to factors such as logistical challenges faced by our courier partners.


Please allow up to 2 business days for us to process your order. However, most orders are usually dispatched within 1 business day.

Shipping for US Customers

Standard Shipping: 2-7 business days.
Express Shipping (UPS): 2-business day shipping.
  • Orders below $39: Flat shipping rate of $5.
  • Orders between $39-$100: Free standard shipping.
  • Orders above $100: Free 2-day shipping.
Should your order be delayed beyond 3 business days of the estimated delivery, please get in touch with our team at hey@hyperazor.co.

Shipping for UK, EU, Australia, New Zealand & Canada Customers

Standard Shipping (USPS): 7-21 business days.
  • Orders below $39: Discounted flat rate of $15.
  • Orders between $39-$150: Further discounted rate of $9.
  • Orders above $150: Free shipping.
Express Shipping (UPS): 3-7 business day shipping. Rates are provided at checkout based on your destination.
For these countries, tracking is provided, but real-time updates may not always be available. Should your package be delayed by over 7 business days, please contact us at hey@hyperazor.co.

Shipping for Rest of the World Customers

Standard Shipping (USPS): 7-30 business days.
  • Orders up to $150: Discounted flat rate of $30.
  • Orders above $150: Discounted rate of $20.
Express Shipping (UPS): 3-10 business day shipping, with rates provided at checkout based on destination.
For these countries, we provide tracking details, but real-time updates might not be available. Orders are typically delivered within 3-10 business days post-shipping. If you experience a delay beyond 10 business days of the estimated delivery, please reach out to us.

International Duties & Taxes

  • You are responsible for understanding the import regulations of your country. Hype Razor is not liable for any tariffs, customs regulations, or associated fees.
  • Any additional fees such as taxes, duties, quarantine fees, and package warehousing fees levied by your local customs office are separate from the shipping charge and will be billed directly to you.
  • Hype Razor will not refund items seized at your local customs office or undelivered items unless they are returned to us. Should a shipment be returned, any shipping fees, including the return shipping, will be deducted from the refund.
  • Delivery times stated are under the assumption of no customs or other delays. Customs clearance can vary, ranging from one day to thirty days.
For any concerns or issues related to delivery, after obtaining your tracking number, we recommend first contacting the respective carrier. If the carrier is unable to assist, do get in touch with us at hey@hyperazor.co.

This wraps up our shipping policies. By placing an order on our site, you confirm your agreement with these terms.

04

Returns & Exchange Policy

Returns & Exchange Policy

15-Day Return Policy

Your X1 razor is designed with longevity in mind; meant to last generations. While we believe you'll cherish it forever, if for any reason you're dissatisfied, we're here to help.


Returning Your Razor

If you wish to return your razor, please ensure you're familiar with the following criteria:

  • Returns are accepted within 15 days from the delivery date.
  • Only one return is accepted per customer. While we're confident in our product, we want you to have the opportunity to try it. Therefore, after the initial return, further returns from the same customer won't be accepted. (Our Lifetime Warranty still applies for manufacturing defects.)
  • Contact our support at hey@hyperazor.co with your return request before sending back the product.

Return Condition

  • All returned razors should be in their original packaging and in like-new, working condition.
  • We will request photographs of all items. Specific instructions regarding these photographs will be provided when you contact our customer support.

Shipping Returns

  • Customers are responsible for sending the item(s).
  • Return shipping expenses are non-refundable nor reimbursable. If you opt for our shipping method for the return, the associated costs will be deducted from your refund. Please note, return labels may be offered as a service, but is not guaranteed.
  • For items valued over $75, it's recommended to use a trackable shipping service or get shipping insurance. We can't guarantee the receipt of returned merchandise. Should it get lost or damaged in transit, a refund won't be issued.

Exceptions & Non-refundable Situations

  • Returns made after 15 days from delivery.
  • Customers who have previously returned a razor.
  • Returns made without prior communication with our customer support team.
  • Products purchased from third-party distributors, retailers, or resellers.
  • Items showing signs of misuse or damage due to abuse.
  • Lost or stolen items.

Refund Policy

A full refund will be issued to your original payment method, covering the product price and applicable taxes if the return request is made within the specified 15-day period. Original shipping costs, however, will not be refunded. This includes orders where we initially offered free shipping. 

Our third-party logistics (3PL) warehouse requires up to 10 days for receiving and quality control procedures. After Quality Control (QC) is finalized and depending on its outcome, your refund will be processed within 2 business days. Subsequently, it might take additional 5-10 business days for the funds to reflect in your account.

Late or Missing Refunds:
  • Recheck your bank account.
  • Contact your credit card provider, as it might take some time before your refund reflects.
  • If after these steps your refund hasn't been received, please contact our team at hey@hyperazor.co.

Exchanges

We only replace items if they are defective or damaged. The time required for an exchanged product to reach you might vary based on your location.

Gift Returns

For returns of items received as gifts, we need the details of the original purchaser to process the refund or replacement.

free, fast us shipping

Free shipping for US orders and

discounted International rates.

risk-free trial

Try it to believe it! If you are not

satisfied, return the razor within 15 days.

lifetime warranty

Built with highest quality standards

to last your lifetime - backed by your

lifetime warranty.

beyond shave